
headlight
#1
 04-29-2010, 06:17 PM
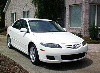

I'm wanting to change my headlights and those fog lights as Mazda calls them, that's in the headlight housing. I read a while back that you have to take the frt bumper off to change out the frt lights...is this right??


#6
05-04-2010, 08:46 PM
I have found that even with better bulbs the headlights are still inferior. Anybody have any ideas how to make them better and maybe a diy on how to remove the whole assembly? Also the low beams seem to have some kind of fogging or dirt inside or is that the way that they look normally? That would be a good reason to remove the assembly on this 2008.
#7
05-04-2010, 09:56 PM
Honestly the only way to improve upon the headlights performance is to convert over to an HID kit, which is not as scary as it sounds. I'll look for a write up on it and post back up here tomorrow.
#8
05-05-2010, 08:33 AM
Thanks, I would really appreciate that. I have looked at the HID system. Actually the lights on my 2008 are so poor it seems almost unsafe. The high beams don't seem as bad but the lows are pitiful. I have a BMW that uses HIDs and they are great. I think that I would go to the trouble if I was sure it would help. Is it possible that you know why these things are so poor. I had a Ford Contour that had poor lights but I originally assumed that the solar deterioration of the lens was the primary cause. After changing out the lights it was found that even with new lights they were still awful compared to other brands. I wonder if complaints to the manufacturer would do any good?
#9
05-05-2010, 09:42 AM
The install for the Katsuro's is pretty much identical to the Xtec and Apexcone kit.
First you NEED to remove your bumper. I read a few posts about people talking about installing these without removing the bumper. Some people might be tentative about removing it but it seriously takes only 10-15 minutes to do it. You need to remove your bumper to get at the 2 lower screws on the headlights and to mount the ballasts.
First, examine your kit out of the box....

There should be 2 ballasts, 2 HID lights with wires, and 2 pieces of double sided tape. This kit is PnP so there is no wiring harness involved.....
--------------------------------------------------------------------------------------------------------------------------
Step 1: Removing your Bumper
http://www.6crew.com/forum/showthread.php?t=5527
A few comments on removing your bumper:
Personally, I did not jack the car up. You really dont need to. My car is lowered and I have a small stubby phillips head screwdriver which I use to unscrew the lower 8 bolts on the car. Also, getting at the 3 side pop out screws in the wheel well is difficult. I recomment parking your car with the wheels turned to the EXTREME right, then unscrewing the entire left side of the bumper then re-starting your car and turning your wheels to the EXTREME left, and then unscrewing the entire right side. This makes taking off the bumper a breeze. See picture below to understand what I am talking about:

As you can see, with your tire completely turned, its really easy to get at the 3 pop tabs and the screw under the wheel well liner.
--------------------------------------------------------------------------------------------------------------------------
Step 2: Removing your headlights
First, you need to remove the headlights. When removing the headlights, I removed 5 bolts and a pop up tab, for a total of 6 "bolts". There are 2 bolts on the top of the headlight, 2 bolts on the bottom, one bolt on the white part on the side of the headlights, and one black small pop up tab on the top which requires a knife to pop it up then you pull it loose with your fingers. See pictures below:


There is one electrical connection to the headlights that CAN or CANT be unplugged. For my left headlight, the plug came off easily so I removed it, however, for the right one, it was a little tough so I did the install on the right side with the cable still attached...... its your choice. I did it both ways. If you DO leave the cable plugged in though, make SURE you have a second set of hands as you will need someone to hold the headlight up while you work on it. Luckily my retired pops, who is a car guy himself, did not have much to do today and was eager to help his son play with his car.
Pics of the removed headlights:


When your headlights are removed, and optional step would be to remove the beam reflector inside the headlights...... You should remove the beam reflector as it cuts down on glare!!!!
Instructions for removing:
ANTI-GLARE MOD
--------------------------------------------------------------------------------------------------------------------------
Step 3: Removing and modifying the dustcaps
Next, you need to take off the dust cap to get to the H1 bulbs. To the left of the headlights is where the H1 low beams lie. To get to them you need to remove the dust cover:

Just twist it and it pops off. Dont lose the rubber circles around the inside of the dustcaps. Mine fell off but make sure you dont lose them because they keep the dustcap sealed tight.
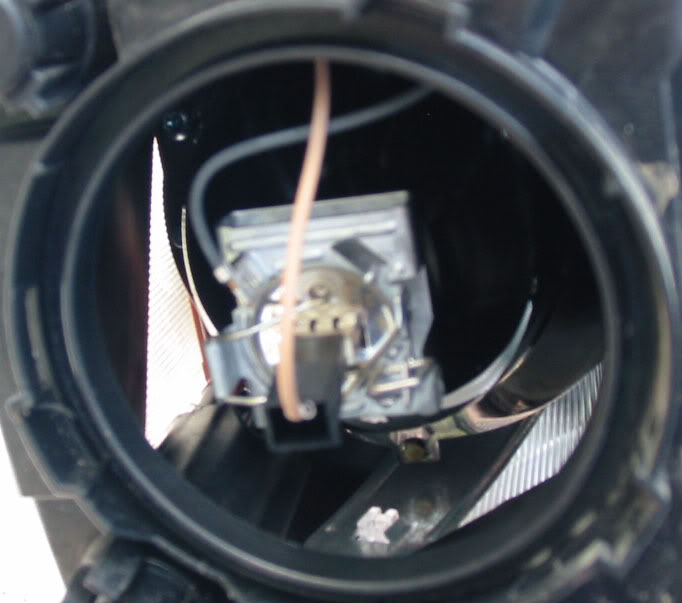
Above is a picture of the inside of the lights with the dustcap off.
When your dustcaps are off, take your dustcap and drill a small pilot hole in the middle of them:

The other installation how tos call for a 7/8 inch butterfly drill bit..... I would recommend using something a little smaller. The rubber grommet that fits in the hole was a little loose using the 7/8th butterfly bit. If I went a size down, the grommet would have fit a bit snugger so I would recommend using a smaller bit.... you can always enlerge the hole but you cant make it smaller. Once your drill the hole, us some sandpaper around the edges to make it smooth.

--------------------------------------------------------------------------------------------------------------------------
Step 4: Removing the stock bulbs
Next, you need to take the positive and negative wires off the stock H1 headlights. There is a metal wire clip now holding the light in place. If you look to the bottom of the clip, you will see where it is hooked on a small hook. Pull the metal wire around the clip and it pops up and you can easily take our your stock H1 headlight. Remove your stock H1 headlights and put them in a safe place incase you ever want to revert back to stock.

--------------------------------------------------------------------------------------------------------------------------
Step 5: Re-installing the modified dustcaps
Now, when you have all the wires not connected, take the dustcap with the hole in it and put it OVER the wires and the HID light. Slide it past the rubber grommett and begin working on the power and ground connections. If you skip this step, you will go to put your headlights in, connect them, and then have to magically run wires through the dustcap. I ran the wires through, and because the rubber grommett was a little loose in the 7/8 inch hole in the dust cap, I covered it in electrical tape to ensure no moisture could enter the headlight housing.


--------------------------------------------------------------------------------------------------------------------------
Step 6: Connecting the HIDs
The positive wire from the Katsure kit fits in perfectly, however the ground wire does not. The stock metal holder is a little small and needs to be widened to fit in the stock clip. Be CAREFUL when doing this. Where the actual stock ground wire connects to the clip looks to be pretty fragile. I used a pair of needle nose pliars to hold the end of the clip and a small flathead screwdriver to enlarge the clip.

The RED arrow shows where the ground wire is connected. This is the holder that needs to be slightly enlarged. The YELLOW arrow shows where the wire is connected to the holder. This section is pretty fragile and is where I held it with my needne nose pliars. The BLUE arrow is where the power wire easily connects.
After I connected all the connections, I covered them TIGHTLY with electrical tape.

Then, once all the connections were connected, I tested the HIDs by turning on my headlights to make sure they were working properly. You dont want to install everything, put your bumper back on, and then realize you have a loose connection. The lights came on perfectly.
Now you get to connect everything to your car. I then connected the HID bulbs in the stock headlight housing. Be CAREFUL when sliding in the bulbs..... its a very tight fit. If you look at the bulb holder, there is a small circle cutout in it for putting in the bulbs. The bulbs only go in in one direction..... Once the bulbs are in, CAREFULLY clip down the metal clip. It was a pretty tight fit to re-connect the clip because of the larger rubber base around the HID bulb. I used a small flathead screwdriver to help "guide" the clip back into the holder. Once the light is in, screw in your dustcap and I put the headlight back in. I put ONE screw in the headlight to hold it in place while I was mounting the ballasts. Make SURE when you are putting the headlights back in place that you dont bend or stress the wires coming out of the dustcap. Its a VERY tight squeeze in there so make sure your wires have a good clear path and are not being compressed and bent in funny directions when you put the headlights back in.
[B]
First you NEED to remove your bumper. I read a few posts about people talking about installing these without removing the bumper. Some people might be tentative about removing it but it seriously takes only 10-15 minutes to do it. You need to remove your bumper to get at the 2 lower screws on the headlights and to mount the ballasts.
First, examine your kit out of the box....
There should be 2 ballasts, 2 HID lights with wires, and 2 pieces of double sided tape. This kit is PnP so there is no wiring harness involved.....
--------------------------------------------------------------------------------------------------------------------------
Step 1: Removing your Bumper
http://www.6crew.com/forum/showthread.php?t=5527
A few comments on removing your bumper:
Personally, I did not jack the car up. You really dont need to. My car is lowered and I have a small stubby phillips head screwdriver which I use to unscrew the lower 8 bolts on the car. Also, getting at the 3 side pop out screws in the wheel well is difficult. I recomment parking your car with the wheels turned to the EXTREME right, then unscrewing the entire left side of the bumper then re-starting your car and turning your wheels to the EXTREME left, and then unscrewing the entire right side. This makes taking off the bumper a breeze. See picture below to understand what I am talking about:
As you can see, with your tire completely turned, its really easy to get at the 3 pop tabs and the screw under the wheel well liner.
--------------------------------------------------------------------------------------------------------------------------
Step 2: Removing your headlights
First, you need to remove the headlights. When removing the headlights, I removed 5 bolts and a pop up tab, for a total of 6 "bolts". There are 2 bolts on the top of the headlight, 2 bolts on the bottom, one bolt on the white part on the side of the headlights, and one black small pop up tab on the top which requires a knife to pop it up then you pull it loose with your fingers. See pictures below:
There is one electrical connection to the headlights that CAN or CANT be unplugged. For my left headlight, the plug came off easily so I removed it, however, for the right one, it was a little tough so I did the install on the right side with the cable still attached...... its your choice. I did it both ways. If you DO leave the cable plugged in though, make SURE you have a second set of hands as you will need someone to hold the headlight up while you work on it. Luckily my retired pops, who is a car guy himself, did not have much to do today and was eager to help his son play with his car.
Pics of the removed headlights:
When your headlights are removed, and optional step would be to remove the beam reflector inside the headlights...... You should remove the beam reflector as it cuts down on glare!!!!
Instructions for removing:
ANTI-GLARE MOD
--------------------------------------------------------------------------------------------------------------------------
Step 3: Removing and modifying the dustcaps
Next, you need to take off the dust cap to get to the H1 bulbs. To the left of the headlights is where the H1 low beams lie. To get to them you need to remove the dust cover:
Just twist it and it pops off. Dont lose the rubber circles around the inside of the dustcaps. Mine fell off but make sure you dont lose them because they keep the dustcap sealed tight.
Above is a picture of the inside of the lights with the dustcap off.
When your dustcaps are off, take your dustcap and drill a small pilot hole in the middle of them:
The other installation how tos call for a 7/8 inch butterfly drill bit..... I would recommend using something a little smaller. The rubber grommet that fits in the hole was a little loose using the 7/8th butterfly bit. If I went a size down, the grommet would have fit a bit snugger so I would recommend using a smaller bit.... you can always enlerge the hole but you cant make it smaller. Once your drill the hole, us some sandpaper around the edges to make it smooth.
--------------------------------------------------------------------------------------------------------------------------
Step 4: Removing the stock bulbs
Next, you need to take the positive and negative wires off the stock H1 headlights. There is a metal wire clip now holding the light in place. If you look to the bottom of the clip, you will see where it is hooked on a small hook. Pull the metal wire around the clip and it pops up and you can easily take our your stock H1 headlight. Remove your stock H1 headlights and put them in a safe place incase you ever want to revert back to stock.
--------------------------------------------------------------------------------------------------------------------------
Step 5: Re-installing the modified dustcaps
Now, when you have all the wires not connected, take the dustcap with the hole in it and put it OVER the wires and the HID light. Slide it past the rubber grommett and begin working on the power and ground connections. If you skip this step, you will go to put your headlights in, connect them, and then have to magically run wires through the dustcap. I ran the wires through, and because the rubber grommett was a little loose in the 7/8 inch hole in the dust cap, I covered it in electrical tape to ensure no moisture could enter the headlight housing.
--------------------------------------------------------------------------------------------------------------------------
Step 6: Connecting the HIDs
The positive wire from the Katsure kit fits in perfectly, however the ground wire does not. The stock metal holder is a little small and needs to be widened to fit in the stock clip. Be CAREFUL when doing this. Where the actual stock ground wire connects to the clip looks to be pretty fragile. I used a pair of needle nose pliars to hold the end of the clip and a small flathead screwdriver to enlarge the clip.
The RED arrow shows where the ground wire is connected. This is the holder that needs to be slightly enlarged. The YELLOW arrow shows where the wire is connected to the holder. This section is pretty fragile and is where I held it with my needne nose pliars. The BLUE arrow is where the power wire easily connects.
After I connected all the connections, I covered them TIGHTLY with electrical tape.
Then, once all the connections were connected, I tested the HIDs by turning on my headlights to make sure they were working properly. You dont want to install everything, put your bumper back on, and then realize you have a loose connection. The lights came on perfectly.
Now you get to connect everything to your car. I then connected the HID bulbs in the stock headlight housing. Be CAREFUL when sliding in the bulbs..... its a very tight fit. If you look at the bulb holder, there is a small circle cutout in it for putting in the bulbs. The bulbs only go in in one direction..... Once the bulbs are in, CAREFULLY clip down the metal clip. It was a pretty tight fit to re-connect the clip because of the larger rubber base around the HID bulb. I used a small flathead screwdriver to help "guide" the clip back into the holder. Once the light is in, screw in your dustcap and I put the headlight back in. I put ONE screw in the headlight to hold it in place while I was mounting the ballasts. Make SURE when you are putting the headlights back in place that you dont bend or stress the wires coming out of the dustcap. Its a VERY tight squeeze in there so make sure your wires have a good clear path and are not being compressed and bent in funny directions when you put the headlights back in.
[B]
#10
05-05-2010, 09:43 AM
-------------------------------------------------------------------------------------
Step 6: Mounting the Ballasts[/B]
Next, you need to choose a mounting place for the ballasts...
For mounting the ballasts, the kit gives you 3m super adhesive tape. I would recommend cleaning ALL surfaces before applying the 3m double adhesive tape. I mounted my ballasts in the same exact place as shown in the installation how-to. The metal wall next to my air filter was extremely dirty and so was the metal wall behind the windshield washer fluid tank. Take a little bit of rubbing alcohol (I used isopropryl) and put it on a paper towel and clean the side of the metal on your car and then clean the surface or the HID ballast. Dont spill any rubbing alcohol on your driveway because it will "stain" your driveway and your retired father will yell at you....... take it from Philter.
New Mounting Location For Slim Line Ballasts


Mounting for Full Sized Ballasts
The diagram below is for the full sized ballasts without any mounting holes...the tape provided with these ballasts is not good and the ballasts tend to fall off after a little bit of driving...to fix this problem with complete piece of mind you will need to go to the hardware store and pick up a metal bracket in the shape of an s....the diagram below should do the rest of the explaining for me...if you have any questions pm me and i will help you out!


Old Passenger side mounting location:

Old Drivers side mounting location:

The main difference between our ballasts and the Apexcone ballast is that the Katsuro ballast do NOT have an extra hook on them so you could screw them into the metal....... the ballasts are connected with 3M double sided tape. The tape seems like if you clean all surfaces and get a good connection, it will stick..... however because I am ****, I plan on checking the "connection" between the ballast and the metal the next time I have my car apart.
--------------------------------------------------------------------------------------------------------------------------
Step 7: Re-assemble your car
Once you run the wires and mount your ballasts, re-screw in your headlights and test them one more time to make sure they work. Once you verify again that they are working perfectly, re-install your bumper and screw everything back together.
--------------------------------------------------------------------------------------------------------------------------
Step 8: Now admire your new HID kit:
Pic showing new HIDs compared to stock ugly foglights.... yucky fogs.

Cutoff shots on the old garage door: The lights are perfectly even, I just took a few shots because I was holding the camera up on top of my car and it was slightly crooked.
Cutoff shot, picture taken on top of car:

Your writeup sir. This writeup works for all kits.
Step 6: Mounting the Ballasts[/B]
Next, you need to choose a mounting place for the ballasts...
For mounting the ballasts, the kit gives you 3m super adhesive tape. I would recommend cleaning ALL surfaces before applying the 3m double adhesive tape. I mounted my ballasts in the same exact place as shown in the installation how-to. The metal wall next to my air filter was extremely dirty and so was the metal wall behind the windshield washer fluid tank. Take a little bit of rubbing alcohol (I used isopropryl) and put it on a paper towel and clean the side of the metal on your car and then clean the surface or the HID ballast. Dont spill any rubbing alcohol on your driveway because it will "stain" your driveway and your retired father will yell at you....... take it from Philter.
New Mounting Location For Slim Line Ballasts
Mounting for Full Sized Ballasts
The diagram below is for the full sized ballasts without any mounting holes...the tape provided with these ballasts is not good and the ballasts tend to fall off after a little bit of driving...to fix this problem with complete piece of mind you will need to go to the hardware store and pick up a metal bracket in the shape of an s....the diagram below should do the rest of the explaining for me...if you have any questions pm me and i will help you out!
Old Passenger side mounting location:
Old Drivers side mounting location:
The main difference between our ballasts and the Apexcone ballast is that the Katsuro ballast do NOT have an extra hook on them so you could screw them into the metal....... the ballasts are connected with 3M double sided tape. The tape seems like if you clean all surfaces and get a good connection, it will stick..... however because I am ****, I plan on checking the "connection" between the ballast and the metal the next time I have my car apart.
--------------------------------------------------------------------------------------------------------------------------
Step 7: Re-assemble your car
Once you run the wires and mount your ballasts, re-screw in your headlights and test them one more time to make sure they work. Once you verify again that they are working perfectly, re-install your bumper and screw everything back together.
--------------------------------------------------------------------------------------------------------------------------
Step 8: Now admire your new HID kit:
Pic showing new HIDs compared to stock ugly foglights.... yucky fogs.
Cutoff shots on the old garage door: The lights are perfectly even, I just took a few shots because I was holding the camera up on top of my car and it was slightly crooked.
Cutoff shot, picture taken on top of car:
Your writeup sir. This writeup works for all kits.